How to Install Hydro Series H100 Extreme Performance Liquid CPU Cooler
How to Install Hydro Series H100 Extreme Performance Liquid CPU Cooler
The tutorial was originally made by Jeff Checchi on the 29th July 2011 at the Corsair blog (http://goo.gl/aPdkv). Well, they continue to provide us with their amazing tutorials. So, I do not claim that this is my work. I`m only sharing the tutorial with you. All credits go to him.
The Hydro Series™ H100 is the new top of the line all enclosed water cooling CPU coolers from Corsair. The H100 is similar to other Hydro Series CPU coolers from Corsair with a few exceptions, the main one being that the H100 uses a longer 240mm radiator. Luckily all of Corsairs PC cases will support the H100 and this blog will serve to illustrate the process. We will be installing it in our Obsidian Series™ 800D full-tower case.
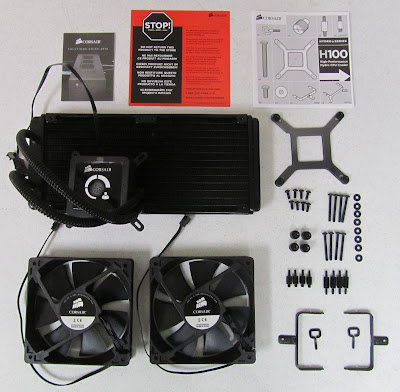
First, it’s a good idea to lay out your components and make sure you have everything you will need for your particular CPU socket. The H100 supports the following CPU sockets right out of the box:
- Intel: LGA, 775, 1155, 1156, 1366 2011
- AMD: AM2, AM3
In this build we will be using an EVGA P55 motherboard which uses the 1156 socket. The H100 comes out of the box with the Intel bracket already attached, so we are ready to move on to the next step. If you are mounting the H100 on an AMD socket, you will want to unscrew the Intel bracket that is already mounted to the cooling unit, and then screw in the AMD bracket. There are 4 screws, 2 on each side which are outlined in the picture below.
The backplate on the H100 is adjustable and can be configured for any of the supported socket types. Just slide the pins on the bracket so that they align with the holes on the motherboard and then use the double-sided mounting bolts to secure it into place. With the 800D’s CPU backplate cutout, you can apply the bracket without having to remove the motherboard from the case.
The mounting bolts serve two purposes, one is to secure the backplate to the motherboard, the other is to give you a mounting point for your CPU cooling unit and bracket. In the picture below you will see two out of four of the mounting bolts are already installed and circled in yellow.
Now that the backplate is secure, we will mount the radiator. It will be easier to mount the radiator first, and then the CPU cooling unit, rather than the other way around.
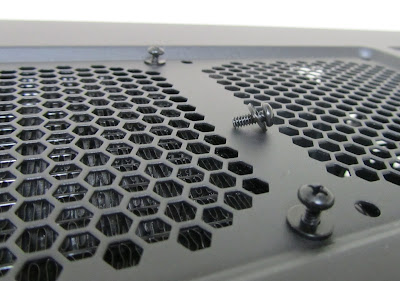
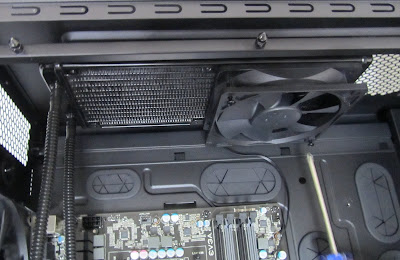
In the Obsidian Series 800D there is a large mounting area for the H100 in the top of the case. Find your 8x 10mm screws (the shorter ones) and washers and get them ready to screw into the radiator. The following picture shows me holding the radiator in place (outlined in yellow), getting ready to mount it with the 8x 10mm screws.
The correct order for screwing in the radiator screws is Screw > Washer > Case > Radiator.
Once you finish securing the radiator in place, we will mount both fans on the radiator. Every Corsair fan will show you both the direction of airflow and the direction which the fan blades will spin. Look closely on the sides of the fan for two arrows pointing in these directions.
The fan direction with the H100 is optional, and dependent on how many exhaust fans you already have, the key is to have a good balance of intake versus exhaust. In most configurations with the H100 we would recommend using the fans as exhaust, which we will be doing with the 800D.
When mounting the fans I find that it is easiest to thread 2 screws in by hand in a diagonal pattern, which will align the fan with the holes in the radiator. Once the fan is pinned loosely to the radiator, screw it in the rest of the way and then add your two remaining screws. Repeat the process with the second fan.
Once the radiator, fans and backplate are mounted, it is time to mount the CPU cooling unit. Simply line up the pins with the holes on the CPU bracket and tighten it down with the supplied thumb screws. The H100 comes with thermal material already applied to the CPU cooling unit. When you are ready to mount the CPU cooling unit, remove the plastic shielding that covers the thermal material and use the 4x thumbscrews to secure it to the mounting bolts that we used to secure the backplate earlier.
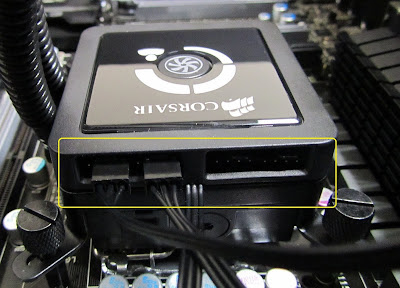
Now that the unit is mounted, we will want to plug in power cables for both fans and the pump. The H100 has an integrated 4-fan hub which is where you will want to plug in your H100 fans. This is outlined in yellow in the picture below.
Plugging the fans directly into the integrated 4-fan hub allows you to select from 3 different fan speed profiles which control fan RPM based on the coolant temperature within the H100. The 3 profiles are Quiet, Balanced, and Performance, and are indicated by the LED display on the H100, you can see a chart showing the relationship between fan speed and coolant temperature for each profile in the picture below.
The final step is to plug in the power cable for the pump. The power cable for the pump has two connectors, one will plug directly into your PSUs 4-pin peripheral cable, and the other will plug directly into your motherboards CPU 4-pin fan header. The H100 is powered by the 4-pin peripheral cable, while the 3-pin fan header sends pump RPM information to your motherboards BIOS.
Now the Hydro Series H100 is completely installed and there is still plenty of room to fill up all the motherboards DIMM slots with some of our tallest Vengeance memory, which measures 52mm in height.
Well, that was how you can Install the Hydro Series H100 Extreme Performance Liquid CPU Cooler. I hope this helped you. Share this post on How to Install Hydro Series H100 Extreme Performance Liquid CPU Cooler


 Previous Entries


0 comments for How to Install Hydro Series H100 Extreme Performance Liquid CPU Cooler
Leave a reply